QuickOPC User's Guide and Reference
Value Targets
The value target represents a place in your application where values can be sent to or obtained from. You configure the value target by selecting the TargetComponent and TargetMember. A typical value target is a property of a visual control on your form. For example, in order to send values to the Text property of the TextBox control, you would set the TargetComponent to the text box control itself, and the TargetMember to a string “Text”.
It is also possible to target the so-called extender properties. In such case, you also need to select the ExtenderProvider component that actually provides the extender property. Typical and useful extender providers are the ToolTip and ErrorProvider components for Windows Forms.
When you select the TargetComponent (and the TargetMember is not set yet), the live binding system attempts to determine the TargetMember that you want to use. For example, the most commonly used property of the TextBox control is the Text property, so it makes sense to provide that as a default. This default member name is determined using several hints, including the DefaultBindingProperty and DefaultProperty attributes on the target component, and other characteristics.
Not all controls (especially 3rd party controls) have their default members marked up (or, they may be marked up inappropriately for live binding). The live binding contains some built-in knowledge that allows proper selection of the default target member for popular controls, even in such cases. If you still get an improper target member selected for you by default, you can always change it to any control’s member you like.
You can type in the name of the target member, or you can select it using the drop-down editor (picture below).
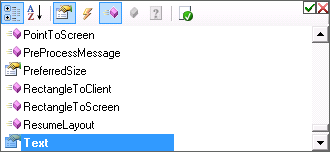
The member name editor shows different icons for different member kinds, annotates the members with number of overloads if needed, shows member information (such as type, and description) in the tooltip, allows filtering (e.g. Properties, Event, Methods, Fields), alphabetical or categorized view, and reverting to default member.
When binding .NET members, you can specify not just a member name, but a whole path to it – i.e. it is possible to bind sub-members as well. The path is a sequence of member names, separated by dots. For example, for binding on a ListBox component, it is possible to set the target path to “Items.Add”, which means that we bind the Add method of the Items collection of the ListBox (in effect, this will append incoming values as new values to the ListBox). If you want to specify the path (sub-members) and not just a single member, you use the TargetPath property instead of just TargetMember. By pressing a down-arrow symbol next to the path, you are offered a tree of available members and sub-members, with various filtering and sorting capabilities:

When binding .NET members (methods) that have multiple overloads, it is possible to specify the desired method signature using a type name in parenthesis, added to the element path. For example, if you wanted to bind the Add method of the Items collection of a ListView, there are two overloads that take one input argument, and the Live Binding would not know which one to use. By using a target path “Items.Add(System.String)”, you will instruct the Live Binding to use the overload that accepts string as an input.